Jumat, 28 Juni 2013

Best sangria ever

Welcome to Friday, whoot! Hope your week was great and you have an even better weekend planned!

First up, I’m over at SAS Interiors today sharing how I strive to create a meaningful home:

CreatingaMeaningfulHome_BlogButton

It’s a great series with some fabulous bloggers contributing – check it out! Thanks for having me Jenna!

So today I’m sharing one of my very favorite recipes…of the liquid kind. :) I figured I’d post it today so maybe you can make it yourselves and toast to the weekend, yes?

Aw yeah.

So a lovely reader shared this sangria with me years ago – I needed a good one for an event coming up and sent out the call on Twitter. I’ve tried a lot of sangria in my day (well not a LOT, but a few…you know. Whatever.) and it’s hard to find one that has the right amount of sweet and fruitiness.

Here’s the thing – the initial cost of the ingredients is a little expensive. The liquor needed is about 20 bucks and then you’ll need to buy a few things to make it each time (most of which we already have). But the expensive stuff will last you a really really long time – so over time it’s not too crazy bad.

Here’s what you’ll need:

classic sangria recipe

1 1/2 cup orange juice
2 tbsp triple sec
1/2 cup brandy
1 bottle (750 ml) fruity red wine (the cheaper, the sweeter, the better) :)
3 tbsp sugar
2-3 cinnamon sticks
lemon/orange/lime or even strawberry, pineapple, whatever!
1 1/2 cup chilled lemon/lime sparkling water

You’ll want to mix the first six ingredients (hold off on the lemon/lime water) and stir. Next up, cut the fruit into slices:

classic sangria recipe

One of the reasons I love this drink is because it’s such a pretty one to serve. :)

Just make sure to clean the fruit well before slicing since you will be adding it to the drink:

classic sangria recipe

Side note – we like our orange juice with pulp. Usually I make this with OJ without it (it’s clearer) but I was using what we had this time.

This is where I like to let it steep in the fridge for a while – preferably over night. But it is still super delicious right away too. My sister-in-law had some right after I mixed it last night and it was yummy, but letting it sit really deepens the flavor.

Right before you serve it (after letting it steep for awhile or right after mixing everything), add the lemon lime sparkling water – this is what gives it a slight fizz. So good!

I make this for every party or girl’s night and it’s always a hit. My SIL and I were reminiscing tonight how my father-in-law loved sangria and would always order it when we went out to new restaurants. Thing is he would always turn up his nose after trying it and it made us laugh every time – he could never find one that was just right.

But I’m proud to say he LOVED my sangria. ;)

Hope you’ll try it and love it too!: best sangria recipe

Have a great weekend, cheers!   

Kamis, 27 Juni 2013

Going to....GMM

I did some work on the exhaust and brought the seat pan to Staf. So he can make a nice seat of it.

Rabu, 26 Juni 2013

Too many spoons in the kitchen

Heyyyy all! How is your week going?

So you get that play on words? Cooks in the kitchen? Spoons? Well…maybe by the end of this post it will be clever.

I’m SO happy to be done with the powder room – have I mentioned that?? There’s a million reasons (hello…functioning bathroom) but one of the big ones is that I can finally start addressing some of the other little projects around the house. I told myself I would hold off until I got the bathroom done.

I told you a few months ago that I’m slowly but surely attacking the clutter hot spots around our house. At this rate I’ll be done next year in time to start it all over again, but whatever.

I’m on a mission in our kitchen to declutter the countertops. Mostly – not completely clear them off, but be smarter about the things we have out. I know it’s probably silly but lately all the utensils next to the stove were driving me crazy:

Especially considering we have a drawer right there that I use for the rest of the utensils:

utensil drawer organization

Problem was, as you can see – it was a hot mess. Every time I’d put something away I would have to try to close the drawer about five times before I finally got it shut. ;)

I realized it was getting a little ridiculous – who needs all those spoons? Really? Especially for someone who rarely hardly ever occasionally cooks? So I took about 15 minutes to declutter the situation.

You’ll notice the wonky drawer organizers in that pic above – that was a little DIY project I did years ago. (I saw the idea at Stephanie’s site here.) At the time I didn’t secure them well enough so they weren’t working so great.

All I did was take scrap wood from the garage and cut it to the width of the drawer and then nail it in. Stephanie just used glue for hers but that didn’t hold well enough for me. So I needed to add one more nail to each side to make them more secure and I used the little trick I used years ago:

utensil drawer organization

I used my Frogtape to mark off where the wood was so I could nail into it without missing. Does that make sense? Cause otherwise this happens:

(The nail didn’t hit the wood and came out the side.)

Obviously you still need to have good aim. Gah!

In hindsight I wish I would have installed the wood slats the long way instead of across, but if I remember right I was trying to work with scraps of wood I already had.

So once the organizers were secure again I started the purging and reorganizing. The bigger items went into a cabinet in the kitchen with like items and all the grilling stuff went outside underneath the grill:

By the way, those little marshmallow sticks telescope out and are perfect for making smores! :) I got them at the Target dollar spot last summer, not sure if they still have them.

We had doubles and triples of plenty, which I pared down. And then I found things that I have NO idea why we had:

Uhhhh…what are those?

I was able to purge plenty so now I don’t even need the holder next to the stove anymore, which was my goal:

gumball fish bowl

On a side note, Squish the Fish is doing AWESOME! We’ve had this Squish for three years now and he’s the most spoiled fish I’ve ever known. My husband loves him. You can see more about the gumball fish tank here.

But let’s marvel at the lovely utensil drawer, with a (little) room to spare:

utensil drawer organization One drawer done, eleventy billion to go.

And one thing you don’t ever think you’ll do until you blog – take a picture of your utensil drawer and share it with the world.

This little spot makes me feel like I did a lot – I find decrapifying is a lot more manageable when I tackle little bits at a time.

So do you have too many spoons in your kitchen? Can you close your utensil drawer??

Senin, 24 Juni 2013

Dark or light side?

Hello all! Hope you had a great weekend! We took a little road trip to the Chicago area for a couple drum corp shows (for hubby), Legoland (for the kiddo) and IKEA (for me). It was a fun, quick trip!

So now that the powder room is done I’m moving on to a room I’ve been itching to change up for a while – our master bedroom. I made some changes earlier this year using things I already had, and the room got a few other changes a couple years ago.

We have a new addition coming to the room that kind of spurred a new redo on but I’ve been wanting to change some things up for a while – No. 1 on my list is getting rid of the striped wall behind our bed. It’s given me the itches for a few years now.

But my biggest dilemma before I can really get moving is the wall color – I’m torn between the allure of a deep, dark wall color and the light and bright look. I STILL can’t decide. Every time I think I have I see a new picture and it takes me back to the dark side. Or light. Or dark.

You get the idea.

I’m drawn to the moody, comfy feeling of a dark room:

dark walls bedroom

(source)

Did you notice the trim is painted the same color as the walls? What do you think of that?

Although if I went dark I would keep the headboard light like Dear Lillie’s room:

dark brown walls white bedding

The light bedding brightens up the room and gives great contrast – I’m a lover of contrast you know.

I actually have a sample of a deep navy color like Carmel’s room:

dark walls dark wood bed

Mine has a little more of an aqua tint to it, if that makes any sense – like a peacock blue. Can I just say how much I LOVE that mirror above her bed too??

In general I think it’s easier to pull in colors with a lighter room, but I love how color was used in this room, even with the dark walls:

dark walls with aqua and blue

(source)

I do love the pop of pink with the dark chocolate walls in this bedroom:

brown walls white bedding

(source)

Just not sure the hubby would go for that. ;)

Here’s a great example of how a darker color completely changes the look of a room:

light room redo to dark walls

(source)

There’s plenty of other changes too, but isn’t funny how much bigger it looks in a dark color? You always think it will be the opposite but that’s not always the case.

But here’s the thing – I’m finding I’m loving the power of a neutral wall color. It’s soothing, yes, but it also allows you more options when it comes to decorating with color:

decorating with color lighter walls

My friend Layla’s old master bedroom is one of my favorites:

cottage style bedroom I love that the walls and bedding are light but the room is still so warm and colorful.

I think it’s evident by my photos (and recent projects) that I’m loving the wall planks:

white walls, black and green accents

(source)

I just adore that room – I think every room can take some black pieces and this looks amazing with the white walls and green accents. Love!

And no, I’m not planking our bedroom walls – I need a break from the painting for awhile. ;)

Of course it doesn’t have to be white on the walls – I don’t think I could do an all white room anyway. This greige-ish space is just beautiful:

light room with blue and greenI love that you could pull in pretty much any accent color and it would work. It’s that a gorgeous room?

I love this blue color too – and it proves that a lighter color can still offer plenty of contrast against white trim:

two story bedroom

(source)

I also love that there are plenty of darker accents in there (rug, chairs, ottomans) that offer some depth without making the room really heavy.

Overall I just love the idea of a calming, serene space:

molding same color as walls

(source)

But the thing is, our current wall color is darker (Tornado Watch at Lowe’s) and it feels super cozy too:

dark walls bedroom

A dark room feels like a hug to me, a lighter one feels like a big breath of fresh air.

Decisions, decisions.

A few months ago I was getting ready to slap a deep color on the walls, now I’m leaning big time toward a light color. I think I’m ready for a change!

What is your favorite for a bedroom – dark or light? Do/did you struggle with your wall color like me or did you know exactly what you wanted? Do tell!

P.S. I also painted the Bub’s room a dark blue but kept it light with lots of white trim – you can see it here.

Sabtu, 22 Juni 2013

Why Join The BGA? Cole and Laila Weigh In


Cole Mc Bride, Visions Espresso, Seattle, WA

For me, joining the Barista Guild of America (BGA) has been one of the best decisions I've made in my career as a coffee professional. Becoming connected with some of the most knowledgeable and dedicated people in the community was huge for me. This community reaches outside of the walls that you work within. Coming together at Barista Camp with these folks, getting to know them and share ideas with them, has helped me become a better barista in many ways, especially with regard to professional service. 

Another area of value I see in joining the BGA is barista competitions. Most of the people competing are BGA members and I've learned so much from their experiences in competition. Training for these events has helped me learn to be a better barista by getting feedback from the judges that was extremely valuable. BGA members also receive a discount on registration fees. 

Events that the BGA and SCAA put on are always amazing and I look forward to many more to come. Member-Driven Events (MDE) are a great way to connect with your local community and help make the BGA a stronger organization. Barista Camp is an amazing educational event that the BGA puts on twice a year and I cannot think of a better place to get an education in being a great Barista. 

Laila Ghambari, Caffe Ladro, Seattle, WA

The BGA is a volunteer based organization. The fact that it’s busting at the seams with talented, hard-working people, shows how much passion and dedication there is in this industry.
It took me a while to see the importance of the BGA. I didn’t see much representation or events in my area so I didn’t really see what it could do for me. I quickly realized that if I desired to have a BGA presence in my area, complaining wasn’t going to make it happen. I needed to put in my own share of work. I decided to get involved, and it was one of the best decisions I’ve made in regards to, learning, growing and sharing in my coffee profession.
There are three main benefits that I have found from being a part of the BGA: education, community, and networking - and they all work beautifully together. It starts with community. Joining the BGA surrounds you with a group of people with similar interests. Building friendships is a natural occurrence. From these people you will learn more than you could have imagined. Not only does the BGA have an amazing curriculum, the people in the guild are talented professionals and teachers, and you get to be friends with them, and make coffee with them! The sharing of ideas and information with new friends is inevitable. Lastly, the network you have now built around yourself is massive: people from around the world with different jobs, in different companies, in different fields of the industry. A web of connections to just about anything you need is there. I’m not saying that all this comes without work, but if you put yourself out there, it is possible to make being a BGA member one of your most valuable resources.
We are strong because of each individual's hard work. We are present and wide-spread because of every person that gets involved. We are a community that can do powerful things when we work together.
To contact Cole, Laila or other members of the BGA Executive Council, please click here

To join the Barista Guild of America, click here

To create a profile in the SCAA database, first you'll want to click here and complete the steps to create a user account. Then click here and select 'Add to Cart'. Follow the steps through to the purchase screen and once the transaction is complete, you'll be an official BGA member! Please email us at membership@scaa.org if you have questions at any time. We look forward to welcoming you into the BGA community!

Update gs(x) hardtail racer

Today I mounted the electronic parts under the seat section. Shortened the kickstand and took some mock up pics....


Jumat, 21 Juni 2013

DIY nautical oar art

HEY there! Thanks SO much for all the lovely comments on the powder room post! I’m working on answering your questions so stay tuned if I haven’t gotten back to you yet!

I wanted to show you how I made over one of my favorite parts of the room (there are a lot of them) – the boat oar I found at a vintage mart a few months ago:

vintage boat oar redo

I first showed it to you in this post and as of a few days ago it still looked like that. :) This little redo seriously took about 20 minutes, and that was with paint drying!

I started out by wiping it down to prep it for paint:

vintage boat oar redo

I let it dry and then mixed some white paint (I used my CeCe Caldwell stuff, but regular white paint would do just fine. Flat may work better for this particular look.) with a little bit of water:

vintage boat oar redo

I didn’t want the oar to be covered completely – I wanted it to have a “wash” kind of look and this did it:

paint mixed with water for a wash

The nice thing is when it’s watered down a bit it takes even less time to dry. :)

I let it dry about ten minutes, and then used my delicate FrogTape to start marking where I wanted my stripes:

vintage boat oar redo

That one was on the handle -- I just searched striped boat oar images and kind of winged the design.

I taped off each section, painted and took the tape off immediately. I did that just because I knew even though the paint was dry to the touch it wasn’t cured and the tape may remove it. I take my tape off right away whenever I do stripes anyway so I get a really sharp line.

I moved on to the wider part and did a little stripe first:

vintage boat oar redo

When I pulled off that tape it did pull up a little bit of the paint, but I actually liked the look so I didn’t worry about it. I didn’t want it to look perfect anyway. ;)

Then I made a wider one in the middle:

nautical stripes boat oar

You can see there that I cut the FrogTape down the middle for skinnier pieces. Since I was working so fast I didn’t want to put the tape down over the red paint I had just done – this allowed me to keep working quickly. :)

I did all the red stripes, hung the oar in the bathroom and then realized I wanted to pull in some of that blue tone in the room. I had it over at the vanity/sink, but everything around the toilet was red.

So I grabbed the blue paint I used on this post (it worked perfectly!) and added a few more skinny stripes:

nautical stripes boat oar

I gotta be honest…I squealed a little when I saw how it all finished. ;) It was so stinkin’ cute!:

nautical stripes boat oar

I think adding that little bit of blue was a good call – it ties the whole room together!

To hang it I just nailed a picture hanger thing to the back of the handle at the top.

In the real life you can see much more of the bottom of the oar because you see it from higher up than in the pics:

wood planked wall bathroom So that’s how the cutest little oar art came to be! It was super fast and I used paint I already had – the oar itself was $10. Love it!

The room isn’t exactly nautical themed but I think it still works – you don’t need to follow a specific theme to make something you love work in a room!

Thanks again for all the sweet comments my friends! Have a GREAT weekend!

Rabu, 19 Juni 2013

Powder room redo, complete!

Well, the time is here. After ten five three long years, the powder room is finally. done.

It is a GLORIOUS DAY people!! I’m seriously so excited to have this room complete, and I’m even more excited that I LOVE it so!

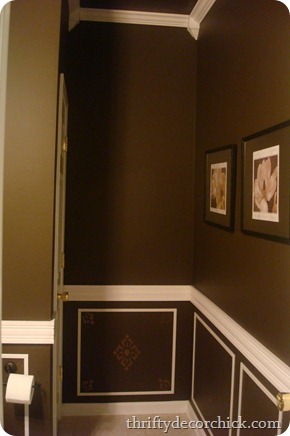
Let’s go back a little bit first, shall we? Pretty sure this room has been five colors now. I’ve never even shown you the before before, but here’s the before since I’ve been blogging: 

brown bathroom

It was in my dramatic days. :) I had a love of all things chocolate brown.

I painted it years back but it was still a mess – holes in the walls, only one coat and the brown was popping through, and then I started the wall treatment forever ago and it sat like this for a while:

wood plank walls

And then I got the planking done and things started to come together, but I think a lot of you thought I was losing it a little bit:

wood plank walls

Did you see my vision? Or did you think I was losing my mind? Or creating a room that looks “a little bit like a barn” as my SWEET husband said?

Well, he finally sees what I had in my head…now. I admit it doesn’t always come together till the very end. Part of the reason this one took so long is I couldn’t decide on a final vision for it – I had a few ideas over the years but finally last year inspiration really hit, in the form of the Bub’s art:

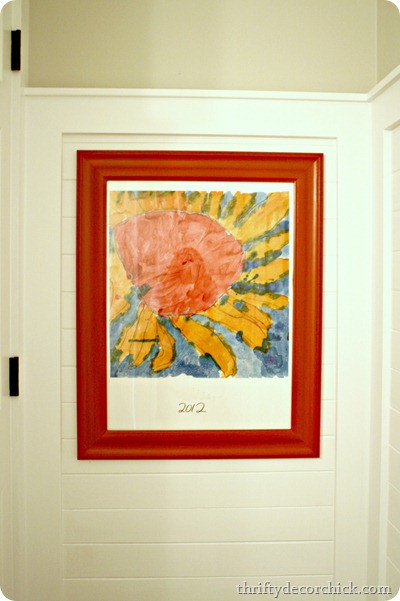
The whole space was inspired by the beautiful colors in this art – at first I was going to paint the walls a bright red, (as you can see above), but I realized quickly that it was going to be too much.

Instead I went neutral but that’s allowed me to really have fun with color in this space:

white wood planked walls

By powder room standards this is a big one. Don’t I know it.

Painting all those wood planks made me want to poke my eyes out:

white wood planked walls The end result was SO worth it though.

Would I do it again?

It may be too soon to ask. ;)

It’s hard to get good shots of this room with my normal lens so I used a wide angle and it made parts of the photos blurry, sorry about that. But I wanted you to be able to see it as I do (without my contacts in, obviously):  white bathroom with red and blue

The room also took a while because I decided last year to continue the wood floors into the room, but waited until it fit in the budget (it ended up costing $300) and the timing worked – we had to pull everything out of the room to have them done:

red blue floral rug

We went without a toilet for a couple weeks and without a sink for a couple months. A fully functioning bathroom is highly underrated. ;)

I adore the dark floors in there. They really warm up the room, especially against all that white trim. Gah. My favorite! I got that rug from Target about a year ago, maybe two? It’s been a while. I loved the colors in it, and when I realized how well the Bub’s artwork matched I knew my plan was meant to be!

It’s also hard to take pics of this room because there’s so little natural light. So bear with me on these! Here’s a good shot of all of the planking that went on in here:

bathroom with planked walls

Remember when I showed you the process and mentioned that I didn’t worry about the seams and lines of the wood planks matching up? Well, the board and batten trim I put over everything is the reason why:

white wood planked walls

The wood planking I used only came in eight foot lengths, so I knew I’d have to cut them down on that long wall. The b and b look was perfect for hiding all that not-so-good stuff! It’s SO not perfect people, it never is!

You can see a good shot of the wall treatment and the new trim around the doors here:

board and batten over planks walls

I’m SO glad I decided to rip out the trim and redo those doors!

Here’s the linen closet door with it’s craftsman trim:

DIY craftsman trim

It makes such a difference!! Luscious.

We used to have a pedestal sink in this bathroom:

And I loved the faucet but the sink was not my favorite. I did like it when we moved in because it was different than a regular vanity that I was used to. But eventually I missed having some storage.

So we went with the IKEA bathroom vanity instead – the only major purchase for this room (other than the floors):

IKEA Hemnes bathroom vanity

The vanity and sink together came in under $300. I shopped all over the place and still found that to be the best deal for the size. I LOVE the sink – it’s so nice to have room for the soap dispenser!

I’ll blog about that whole piece more soon:

oval mirror over bathroom sink

The lights are one of my favorite parts of the room – I found them at Home Depot and just thought they were so different. Kind of vintagey, I love them!:

vintage looking bathroom lights

They also match the new faucet perfectly – couldn’t have worked any better!

You can see in this old pic that we used to have one light fixture above the sink:

I always wanted to do two separate lights, I just love that look!

So that we did:

two lights over bathroom mirror

It brought the light down almost a foot and I just like the lighting better this way in here.

You can see in this area how I mixed blues and reds in the room – again pulling from the art and the rug. It’s a combo you wouldn’t think would work just talking about it, but I LOVE how fresh and pretty it is against the white! I think they work great together!

The blue is more of an aqua blue, but I also used a little true aqua in here too – in the knobs I told you about here and the vase on the vanity:

hydrangea in vase

It’s really a candle holder but I think it works even better as a vase. ;)

The towel is that darker blue and the stuff near the toilet pulls in more of the red:

white room, blue and red decor

I meant to put those lights on a dimmer before I took pics, but it hasn’t happened yet. I’m not touching this room again for awhile! Girl needs a break.

You may recognize the boat oar from my last post. ;) It got a little redo and I stinkin’ love it:

striped boat oar art

So that area about the toilet is hard, don’t you think? I struggle with what to do there – a starburst mirror would be pretty but I already have one mirror on that wall, and do people really want a mirror there? Uh. No.

I almost hung shelves there to fill and decorate, but in the end I wanted it to be simple – I didn’t want a lot of stuff in there. The oar was a perfect fit and it totally makes me smile when I see it. :) (Although I may hang it higher since the toilet paper blocks some of it.)

I really, really adore how it all came together (and I better!!) – it’s so fresh and fun and I really couldn’t be happier. It was a TON of work, not gonna lie. Those planked walls…the installation really isn’t bad, it’s the painting. If I was smart I would have installed it all and then sprayed it before the floors were put in. But oh well…live and learn. I survived. :) 

Here’s a before and after shot – the dark brown we had for years and the light, bright and colorful version we have today:

wood planked walls, bathroom

The total cost was about $1000 for the whole room, which I didn’t think was too bad considering we have hardwoods in there and a new vanity, sink, mirror, faucet, light fixtures and new walls. Oh and that was spread out over a span of about a year, so that helped too.

That’s why I take forever to do all my spaces, don'tcha know? To spread out the costs. ;) (That kind of is true actually. That and I just take forever.)

Anyway, here’s a source list for many of the items and I’ll follow up with more detail on the sink and vanity!

Rug – Target a couple years ago
Frame – Goodwill
Oar – thrift sale
TP holder – HomeGoods last year (I painted it) I just saw some more last week!
Light fixtures – Home Depot
Vanity, sink – IKEA
Faucet – Lowe’s
Mirror – Home Depot
Wood for walls – Lowe’s (see here for how to)

Any other questions? Let me know and I’ll answer them! I did a little happy jig yesterday because this room is finished and I love how it turned out. Can you believe IT’S FINALLY DONE? Sorry for yelling but IT’S FINALLY DONE!!!

Holler.