Jumat, 26 Juli 2013

When money is tight

I don’t know about you, but there have been times in my life when money was T.I.G.H.T. I mean, on the floor of the car, reaching under the seats, trying to find a dollar in change to get enough gas to get me home or to work. (That’s when gas was cheap!) ;)

I learned a few BIG things over those years – one, not having money is one of the scariest, most unsettling feelings ever. It makes you feel completely out of control of your life. But I realized there were certain things I could do that would make me feel like I had control again and doing those things would help tremendously.

Although things are different for me now, there are certainly still times when cash is low – we are adjusting to a definite change since my hubby has retired from teaching. We planned for it and know things will even out so it’s not a scary situation, but it’s easy for those feelings of fear creep back in. It’s silly because my situation is completely different from years ago, but when the bank account goes low and the budget is spent for the month, I can’t help but feel that again, just a little. I will for as long as I live – you just don’t forget that feeling. :)

There are a few things that I’ve always done at times like that – and each of them gives me a sense of having control over my life. The first one may sound a little unusual – but it’s always worked for me.

I clean my car. :)

Now, my car is the thorn in my organizational side. It is just a space that easily gets messy and full of STUFF and I let it get out of control all. the. time. My husband does too. Maybe it’s the creative side of us? ;)

car disaster

Back in the day it was my mom’s car that I would do this with, but I would gather up change from around the house (or the car!) and drive to the car wash place and use their vacuum. I know you can do this at home and save a couple bucks, but for me it’s always getting out and driving there that helps too. When you don’t have any cash you’re not getting out as much so the drive was usually much needed.

I did this the other day and it ALWAYS makes me feel better – just throwing trash away, vacuuming the whole thing – it seriously works! If you are extra ambitious you can get even more detailed with it and maybe clean the outside (at home with the hose). But I’m rarely that good. ;)

It’s just a little thing but to this day it makes me feel better!

Depending on the state of your car, the next one goes hand in hand, and it’s to purge. Or decrapify as I like to say. If you’re like me you’re not always totally on top of stuff around the house when you’re feeling down about something. And again…I think what’s most important when money is tight is to feel like you have control over your home and life.

Going through the closets, the cabinets, the clothes and losing a few pounds of stuff feels SO GOOD. I cannot stress how amazing it feels when you see a pile ready to go out the door:

purging stuff out of the house

Maybe this is just me? All I know is it makes me feel so accomplished, so light and ready to conquer the world.

I wrote a post years ago about what to do with all that stuff too – you may just make some cash from that pile! I break it down into a few different areas – consignment, donation and recycling.

And finally, one that goes hand in hand with purging – organizing what’s left. Like decluttering, it won’t cost you anything! I mean, of course you can always add pretty baskets or organization, but most of the time just reassessing what you already have is enough: 

messy coat closet organized coat closet 

You can get creative with scrap wood, shoe or diaper boxes – whatever! Make labels with your printer or paint chips or scrapbook paper – it doesn’t have to be fancy!

Next month my plan is to get the house decluttered once again! I want to get it done before school gets going in full gear and before the birthdays and holidays later this year. I’m so motivated right now – I don’t know why but I feel like it’s spring instead of late(ish) summer. I have this desire to clean out and organize the whole house!

So what do you do when funds are low? Do you have any go to projects like my car clean out? Like I mentioned, I learned over the years that, for me, the way to fight the fear that comes with financial stress is to figure out something that makes me feel like I have power over my life – and all of these things do that for me, whether money is tight or not!

Have a GREAT weekend!!

Kamis, 25 Juli 2013

Rear control set update


DEMO PMR SMPN 7 CIMAHI


 PERTOLONGAN PERTAMA

 MELEWATI HALANGRINTANG ( PPDG)
 TANDU TUTUP MATA
 HALANG RINTANG


Much More than Salem: America Bewitched

Emily Suzanne Clark

In the early hours of the morning on January 5, 1895, Mrs. Baptiste, “a colored woman,” found “a small black coffin” in front of her residence in New Orleans at Royal Street and Caffin. Once Baptiste realized what was on her stoop, a large crowd of residents congregated at her house and “considerable excitement prevailed.” Sergeant Hevron of the Fifth Precinct arrived and “took charge of the box.” With a hatchet he pried off the coffin’s lid and inside revealed “several candles, a wire mask, and a shirt made out of a oat sack” arranged in such a way as “to represent a body.” For her part, Baptiste was “badly frightened” of the coffin since she “terms herself a voudou.” Her own house had been raided by the police before and “a lot of snakes in bottles, bones, and bundles of letters from her victims” had been uncovered. While it was unknown who placed the coffin at her door, it was clear that they meant her harm. (Story and quotes from “A Voudou Victim. A Coffin on the Doorstep Creates a Sensation,” 6 January 1895, The Daily Picayune; image from George Washington Cable, "Creole Slaves Songs," The Century Magazine, April 1886).

Stories like this, of people seeking supernatural powers to work their will, proliferate throughout American history. As Owen Davies’s recent book America Bewitched: The Story of Witchcraft After Salem (OUP, 2013) demonstrates, America’s relationship with witchcraft did not conclude with Salem in 1692. America Bewitched is an enjoyable read, and one that served as a nice break from working on my dissertation. The book is geared towards a popular audience and so it reads at a pleasant pace with little theory. The chapters are full of story after story of witches and witchcraft in American history from the seventeenth century through the twentieth. The bulk of the prose is narrative surrounding these stories, which range from entertaining or funny, but are more often tragic and gruesome.


As a book written for a wide audience, the book is not argument driven, but this does not mean that it makes no contributions. One of the book’s main strengths is Davies’s attention to the interactions and overlap between the witchcraft beliefs, practices, and fears of early Euro-Americans, recent immigrants, Africans and African Americans, and Native Americans. The porous nature of ideas regarding witchcraft illuminates the realities of what happens when various groups live close together in towns, on plantations, and in tenements. The result is a fascinating tale with a myriad of actors. Additionally, Davies covers witchcraft in all different places and spaces—Alaska; the West; New Orleans; western Pennsylvania; Santa Fe; Norfolk County, Virginia; Galveston, Texas; San Francisco; Memphis; and the Five Points of New York City. Davies finds accusations, folklore, and court cases involving witchcraft from all across the country, dispelling any notion that “superstitious” people are found in any one kind of place or one kind of community.

Davies chose to organize the book thematically rather than chronologically, though the final chapter concludes with Wicca. Those interested in religion and law will find Chapter 3, “The law” and Chapter 7, “Insanity,” of particular interest for Davies’s attention to how court cases involving witchcraft accusations proceeded, how slander cases often resulted from accusations, and how some murder trials of supposed witches helped shape the insanity defense. Material culture scholars too will find much in America Bewitched’s pages, including witch balls, feather wreaths stuck in pillows, tree plugs, and amulets. And anyone interested in cultural interactions and exchanges will find the whole book worth reading.

My main complaint with the book (outside of not liking the cover, and yes, I know that’s a bit of a trite gripe) is its lack of a definition of witchcraft. From my read, witchcraft is understood to mean what his historical subjects take it to mean, which is not inherently a scholarly move with which I disagree. But it obscures how and why certain practices were taken to be witchcraft in one time period. It also leaves me wondering why certain practices might be witchcraft and others not. Were all appeals to the supernatural witchcraft? Mesmerists and Spiritualists were perhaps accused of witchcraft in the newspaper, but Davies writes that “the [news]stories were not always concerned with witchcraft per se, but the actions of mesmerists and spiritualists” too (90). It seems as though Davies had a particular understanding of witchcraft in mind, and this reader would have liked to seen it clearly in print. This could clarify why Davies felt the need to speculate on certain topics, such as whether or not certain “witch murderers” may have suffered from real mental illness or disorders.

Davies states that “we should not consider all such magical practices as timeless and static,” and this statement, along with Davies’s book, open a space for another book: one that interrogates how and why the category of witchcraft has changed in American history. Davies’s definition of witches does identify some helpful markers for the reader. “Motivated by the disruptive forces of spite and envy,” he says of witches, “they were troublemakers, the spreaders of sickness, sowers of discord” (67). As such, witchcraft is always a negative thing in Davies’s narrative, until witches are reinvented in the later twentieth century by Wiccans.

Davies does provide a nice breakdown of the three main “sorts of witches” one finds in American history: the outsider witch, the conflict witch, and the accidental witch. Accusing someone of witchcraft could do political work for the accuser, could serve as a strategy in feuds, or could be the result of some unhappy coincidence. All three of these categories underline an important strength of Davies’s work: his attention to the cultural interactions of his subjects. I wonder if centering the book’s focus on the story of witches in America, rather than witchcraft, might have been a clearer organization. Regardless, America Bewitched is an enjoyable read and covers a wide geographic and temporal spectrum. It could work well either in sections or in whole in various American religious history classes. Students will appreciate its readability and vast array of stories. And it helps demonstrate the numerous ways communities in the U.S. interact with and influence one another.

Rabu, 24 Juli 2013

footpegs/rear controls

Back from the trip means back to the shop. I started working on the rear footcontrols.


Normandie

We had a nice trip...


DIY tufted headboard tutorial

Hello all! I’m so excited to share more about how I made the new headboard in our bedroom. I shared more about the start to this room redo, the new bed and the headboard earlier this week.

I’ve made my own headboards (and for friends!) for years – even before blogging. It’s seriously one of the easiest DIY projects you can do and you will save SO MUCH money doing it on your own.

The headboard part I was used to – but I was totally intimidated by the tufting part. I’ve never tufted one because it seemed like it would be hard…but it is not a big deal! For real, it wasn’t bad at all.

So here we go – I new the shape I wanted the headboard to be for awhile, but I just found out the other day that it had a name:

different shapes of headboards

I wanted the Belgrave look, which was totally easy to DIY. First up, Dad came down and we used his truck to pick up a big piece of mdf at the hardware store – it was a big four by eight foot piece and the Lowe’s Guy cut it down for me:

DIY tufted headboard

I wish I would have taken pics of how I cut the corners out, but it was so quick. Dad and I just searched the garage for something round (and used my bird food holder). I held it up on the corner and figured out how big of a cut out I wanted, then did some quick measurements to make sure it was even on both sides. Then I traced the bottom of the can and cut one side out with the jigsaw. That first piece is all you need to make the second one – just flip it over and place it on the other corner, trace, and you’ve got a mirror image.

I hope that makes sense – it was so fast I didn’t even think to take pics.

Dad helped me take the board upstairs where I went to work! I showed you how I made the headboard in the Bub’s room and this was nearly identical till I got to the tufting part.

Like that one, I used mattress pads instead of foam from the craft store:

foam mattress for upholstered headboard

Why this instead of regular foam? One word – cheaper. ;) Foam is a petroleum based product, so it goes up with the price of gas. Which means it’s just going up and up over time. I haven’t even check the price lately but for three inches of foam for a nearly 80 inch headboard wouldn't be cheap. The size was another reason – I would have had to use numerous pieces of foam to cover this and when you use the mattress pad you can get one big piece.

I had one I had picked up on clearance years ago (look for the XL twin sizes after back to school – you can find them for cheap!) but it was too small for this headboard. So I ended up with a bigger size (queen I think?), then ended up going back to get another one to do two layers because I really wanted it super soft.

One of the things I grew to dislike about our old headboard was how hard it was. I mean, it was wood, so yeah. And it had a curve to it so our heads never fit against it. First world problems. This time I made the headboard tall and cushy that we could comfortably lean against it.

Once the foam is down, you want to secure it with a layer of batting or thin fabric. I used batting first just because, again, I wanted this super soft. And I already had some, so that helped too:

DIY tufted headboard

Then I used a piece of muslin I had in my stash too, to cover everything again. This just secures all the foam and gives you a nice base for the final fabric.

Speaking of that – after all that I was ready to finish it up – and because I was feeling lazy and didn’t want to drive the extra 15 minutes to the fabric store, I actually shopped the drapery aisle at Target:

I wasn’t sure exactly what color I wanted so I grabbed a few. ;) The two on the left were $17 for a panel – which compared to a couple yards of upholstery fabric is pretty good.

Problem was we weren’t crazy about any of them when we tried them out. One was too light, one was too blah and one was too dark.

Soooo…the next day I went to the darn fabric store. ;) I needed the stuff to tuft the headboard anyway (at first I wasn’t planning on tufting. Scared, remember?) so I took a quick look through the fabrics and found one I LOVED in the suit fabric aisle.

Before I used that I figured out where I wanted my tufts and drilled the seven holes:

DIY tufted headboard

I just wanted it to be a simple design and some of the tufting I see is just too much for me. So when I did my math I decided to just do three across the top and four under that. That’s it – anything lower would always be covered by pillows or the mattress so I didn’t even worry about the bottom.

After the holes were drilled I added the final fabric:

DIY upholstered headboard

By the way, years ago I tried the electric stapler you can find at the hardware store (about $30) and it is kind of a pain in my butt to use. It gets jammed and the staples don’t go in evenly no matter what I do. I always revert back to my regular stapler (above) – it takes more muscle but that’s good for ya. ;)

Sometimes the corners can get tricky, so I’ve always used a simple method – start with the middle, then each side, pulling tight each time:
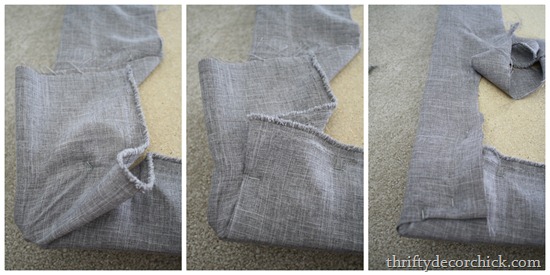
upholstering corners of headboard

For the curved corners I just grabbed the fabric and stapled as best I could:

upholstering curved corners

Remember…no one will see this part. Seriously, the back doesn’t matter. Do what you gotta do!

Here is is in it’s (almost) finished state:

DIY upholstered headboard

Getting there! The suit fabric is like a gray linen and looked so good. Way better than the drapes I picked out – I returned those.

Now the part I dreaded…the (shiver) tufting. So not hard. At all. All the stuff I needed was in the same section at Joann’s. I picked up this waxed thread and it rocked:

wax thread for tufting

It made this SO easy. More on that in a minute.

I grabbed some buttons too – it’s so easy to make your own fabric-covered buttons:

DIY buttons

I just used scrap fabric to make them all. Making buttons is fun.

So the tufting was a breeze – I couldn’t believe I had put it off all this time! I did poke myself a couple times, but overall, easy. :) First up, I threaded one of my long upholstery needles and made a little knot at one end, then stapled it to the back of the headboard:

how to tuft a headboard

Then I pushed the needle through the headboard, threaded the button on, and pushed it back through to the back. This is where the waxed thread comes in super handy – it kind of held the button where it was while I secured it to the back. Regular thread would slip and be hard to keep where you want it. This worked GREAT.

I would just put a staple in the back of the headboard, but wouldn’t push super hard on the stapler, so it didn’t go all the way into the wood. Then I was able to wrap that thread around it a few times, then hammer it down to secure it. (Pic on the right.)

I didn’t pull each button super tight – I didn’t want it to be a deep tuft. Just a little bit of tuft. And there is an easier way to do this by the way – you can just thread both ends of the thread on the needle with the button already on it, then put it through from front to back and then secure. But that method didn’t work for me because the waxed thread was so thick.

I was THRILLED with how it looked! I finished it up with some nailhead trim along the sides:

The particle board I used to make the headboard was 1/2 an inch thick and I went that size on purpose – so these would have something to grab onto. Any thinner and it would have been hard to get them in well.

I’ve never used the connected nailhead trim (I usually just do them individually) but wow, this made it so simple! The nailhead stuff is $21 for five yards, but I had two coupons so I got it for about $10. :)

I hung this up the same way I did in the Bub’s room – I just used picture hanging jobbies:

hanging a headboard

I figured out where the studs were and screwed into those in first, then that determined where I put the hangers on the back of the headboard.

When we got it hung I was so dang happy with how it turned out!: diy tufted headboard

You can see the nailhead trim better in that pic. From the front you don’t see it as much, but it’s a great little detail when you get up closer. I love it!

You can see there why I didn’t add any buttons any lower too – they’d just be covered.

Many of you have asked about the new bedding – I found it at HomeGoods earlier this year:

It’s by Hillcrest and it was a duvet cover and shams for $40. I had been looking for new bedding for months and just happened to find this, new sheets (they aren’t on now – they are darker and I’ll put them back on later in the fall) and the small pillow on the bed all in one trip. None of them are supposed to go together but I think they work well!

So far with what I made on the old bed, I’ve still got about $300+ to spend – I think I may make money on this redo! That’s what I’m talking about.

You can find upholstered and tufted headboards all over the place, but I promise you they are not hard to make on your own! It does take some time so just be patient with it. But you will save tons if you DIY this one -- the Pottery Barn bed on the left is $1000 for a king (gulp), the Ballard Designs on the right is $500+:
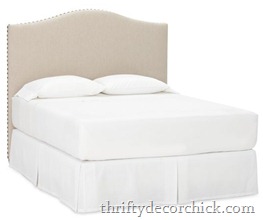
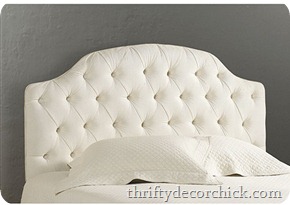
 Pottery barn upholstered headboard ballard designs camden headboard

I think mine looks pretty darn good for less than $100:

DIY tufted headboard

Here’s the break down on cost:

Wood: $15
Foam: $45
Fabric: $8
Buttons, nailheads, etc: $25

Total was $93! Aww yeah. And I have wood, foam, nailheads, buttons and thread left over to use on future projects.

If you went with one layer of foam/egg crate that will go down about $20. I had the batting and muslin but only one of those is really needed and they are both cheap. Of course of you skip the tufting that will help too!

Overall I’m so happy with how it turned out. And it is SO much more comfortable than our old headboard. Have you ever made your own? Did you find it easy to do? Have you ever attempted the tufting? Are ya sceered?